Android学习笔记之四大组件 写在最前面 :
开始写这篇文章时,我也是啥也不懂,啥也不会,因此文章中一定会有许多不足甚至错误!欢迎大家批评指正!
另外,此文章参考了许多文档、教程等,都在引用出贴出了链接,但如果侵犯了作者著作权,请联系我,我会在第一时间删除。
四大组件
活动Activity
服务Service
广播接收器BroadcastReceiver
内容提供程序ContentProvider
Activity
Activity 是与用户交互的入口点。它表示拥有界面的单个屏幕。例如,电子邮件应用可能有一个显示新电子邮件列表的 Activity、一个用于撰写电子邮件的 Activity 以及一个用于阅读电子邮件的 Activity。尽管这些 Activity 通过协作在电子邮件应用中形成一种紧密结合的用户体验,但每个 Activity 都独立于其他 Activity 而存在。因此,其他应用可以启动其中任何一个 Activity(如果电子邮件应用允许)。例如,相机应用可以启动电子邮件应用内用于撰写新电子邮件的 Activity,以便用户共享图片。Activity 有助于完成系统和应用程序之间的以下重要交互:
追踪用户当前关心的内容(屏幕上显示的内容),以确保系统继续运行托管 Activity 的进程。
了解先前使用的进程包含用户可能返回的内容(已停止的 Activity),从而更优先保留这些进程。
帮助应用处理终止其进程的情况,以便用户可以返回已恢复其先前状态的 Activity。
提供一种途径,让应用实现彼此之间的用户流,并让系统协调这些用户流。(此处最经典的示例是共享。)
——Android官方文档
简介 也就是说,Activity是一个单独显示出来的、在前台运行的页面。一个应用程序可以有1个或多个活动,而没有任何限制。每个为应用程序所定义的活动都需要在AndroidManifest.xml中声明。l例如:
1
2
3
4
5
6
7
8
9
10
11
12
13
14
15
16
17
18
19
20
21
22
23
24
25
26
27
28
<?xml version="1.0" encoding="utf-8" ?> <manifest xmlns:android ="http://schemas.android.com/apk/res/android" package ="host.skyone.helloworld" > <application android:allowBackup ="true" android:icon ="@mipmap/ic_launcher" android:label ="@string/app_name" android:roundIcon ="@mipmap/ic_launcher_round" android:supportsRtl ="true" android:theme ="@style/Theme.HelloWorld" > <activity android:name =".DisplayMessageActivity" android:parentActivityName =".MainActivity" > <meta-data android:name ="android.support.PARENT_ACTIVITY" android:value =".MainActivity" /> </activity > <activity android:name =".MainActivity" > <intent-filter > <action android:name ="android.intent.action.MAIN" /> <category android:name ="android.intent.category.LAUNCHER" /> </intent-filter > </activity > </application > </manifest >
应用的主要活动需要在清单中声明,且意图过滤器标签中需要包含 MAIN 动作和 LAUNCHER 类别。
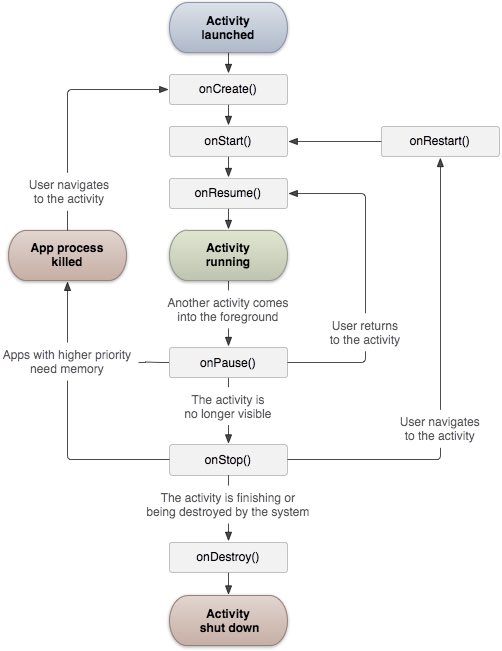
为了更好的展现Activity的生命周期,引用一张来自菜鸟教程 的图片:
如图所示,在Activity的生命周期中,有几个重要的回调函数:
回调
描述
onCreate()在Activity第一次创建时调用
onStart()在Activity为用户可见时被调用
onResume()在应用程序与用户开始可交互的时候调用
onPause()在当前Activity将要被暂停,其他Activity将要被恢复时调用
onStop()当活动不在可见时调用
onDestroy()当活动被系统销毁之前调用
onRestart()当活动被停止以后重新打开时调用
例如,
用户打开你的应用程序,onCreate()被调用,代表Activity正式启动
然后界面渲染完成,并调用onStart()函数
你的程序可以开始和用户交互之前,调用onResume()函数
这时,用户进入了QQ查看消息,你的程序变被暂停,调用onPause()函数,注意被暂停的活动无法接受用户输入,不能执行任何代码。
好,用户回复了几条信息,并返回你的程序,你的程序又即将可以和用户交互,在这之前,调用onResume()函数
但是如果用户返回QQ并不是回复消息,而是看了个超高清视频呢?由于用户手机内存不足,而用户要求执行的程序优先级比较高,于是很抱歉,你的程序的被kill
当用户看完视频,返回你的程序,发现OH~NO,你的程序被kill了,只能从onCreate()开始重新创建程序
当然,如果你的程序被挂起太长时间,比如用户打开哔哩哔哩刷了一个小时的视频,那么同样的,你的程序由于挂起时间过长,也被系统停止了,但和进程被kill不同,如果用户依然需要使用你的程序,那么只需要回到你的程序,而你的程序也只需要调用onRestart()
如果程序执行完了用户的任务,即将正常退出,则在退出之前,调用onDestroy()来进行收尾工作
示例 下面用一个例子来展示Activity的生命周期:
1
2
3
4
5
6
7
8
9
10
11
12
13
14
15
16
17
18
19
20
21
22
23
24
25
26
27
28
29
30
31
32
33
34
35
36
37
38
39
40
41
42
43
44
45
46
47
48
49
50
51
52
package host.skyone.lifecycle;import androidx.appcompat.app.AppCompatActivity;import android.os.Bundle;import android.util.Log;public class MainActivity extends AppCompatActivity { String msg = "Android: " ; @Override public void onCreate (Bundle savedInstanceState) { super .onCreate(savedInstanceState); setContentView(R.layout.activity_main); Log.d(msg, "The onCreate() event" ); } @Override protected void onStart () { super .onStart(); Log.d(msg, "The onStart() event" ); } @Override protected void onResume () { super .onResume(); Log.d(msg, "The onResume() event" ); } @Override protected void onPause () { super .onPause(); Log.d(msg, "The onPause() event" ); } @Override protected void onStop () { super .onStop(); Log.d(msg, "The onStop() event" ); } @Override public void onDestroy () { super .onDestroy(); Log.d(msg, "The onDestroy() event" ); } }
连接手机,启动!
在Android Studio左下角的LogCat中出现:
1
2
3
2021-01-07 11:57:44.614 23856-23856/host.skyone.lifecycle D/Android:: The onCreate() event 2021-01-07 11:57:44.617 23856-23856/host.skyone.lifecycle D/Android:: The onStart() event 2021-01-07 11:57:44.618 23856-23856/host.skyone.lifecycle D/Android:: The onResume() event
在手机上按返回键,出现:
1
2
3
2021-01-07 12:00:14.416 24658-24658/host.skyone.lifecycle D/Android:: The onPause() event 2021-01-07 12:00:14.762 24658-24658/host.skyone.lifecycle D/Android:: The onStop() event 2021-01-07 12:00:14.766 24658-24658/host.skyone.lifecycle D/Android:: The onDestroy() event
Service
服务 是一个通用入口点,用于因各种原因使应用在后台保持运行状态。它是一种在后台运行的组件,用于执行长时间运行的操作或为远程进程执行作业。服务不提供界面。例如,当用户使用其他应用时,服务可能会在后台播放音乐或通过网络获取数据,但这不会阻断用户与 Activity 的交互。诸如 Activity 等其他组件可以启动服务,使该服务运行或绑定到该服务,以便与其进行交互。事实上,有两种截然不同的语义服务可以告知系统如何管理应用:已启动服务会告知系统使其运行至工作完毕。此类工作可以是在后台同步一些数据,或者在用户离开应用后继续播放音乐。在后台同步数据或播放音乐也代表了两种不同类型的已启动服务,而这些服务可以修改系统处理它们的方式:
音乐播放是用户可直接感知的服务,因此,应用会向用户发送通知,表明其希望成为前台,从而告诉系统此消息;在此情况下,系统明白它应尽全力维持该服务进程运行,因为进程消失会令用户感到不快。
通常,用户不会意识到常规后台服务正处于运行状态,因此系统可以更自由地管理其进程。如果系统需要使用 RAM 来处理用户更迫切关注的内容,则其可能允许终止服务(然后在稍后的某个时刻重启服务)。
绑定服务之所以能运行,原因是某些其他应用(或系统)已表示希望使用该服务。从根本上讲,这是为另一个进程提供 API 的服务。因此,系统会知晓这些进程之间存在依赖关系,所以如果进程 A 绑定到进程 B 中的服务,系统便知道自己需使进程 B(及其服务)为进程 A 保持运行状态。此外,如果进程 A 是用户关心的内容,系统随即也知道将进程 B 视为用户关心的内容。由于存在灵活性(无论好坏),服务已成为非常有用的构建块,并且可实现各种高级系统概念。动态壁纸、通知侦听器、屏幕保护程序、输入方法、无障碍功能服务以及众多其他核心系统功能均可构建为在其运行时由应用实现、系统绑定的服务。
注意: 如果您的应用面向 Android 5.0(API 级别 21)或更高版本,请使用 JobScheduler 类来调度操作。JobScheduler 的优势在于,它能通过优化作业调度来降低功耗,以及使用Doze API,从而达到省电目的。如需了解有关使用此类的更多信息,请参阅 JobScheduler 参考文档。
——Android官方文档
简介 通俗点来说:服务是一个后台运行的组件,执行长时间运行 且不需要用户交互 的任务。即使应用被销毁也依然可以工作 。
这部分能力有限,实在无法举例,只能再次引用菜鸟教程 文章的部分内容。
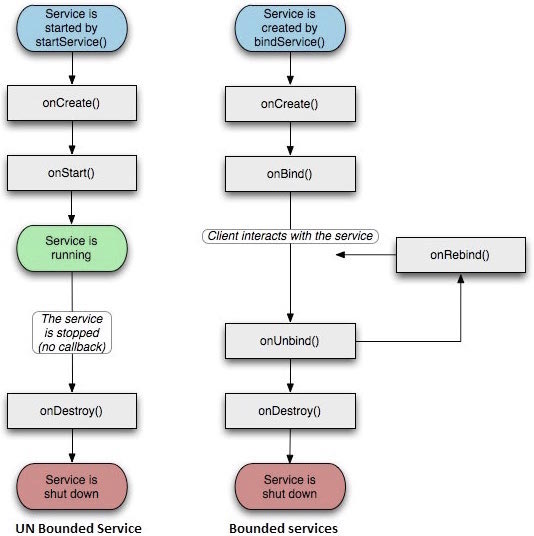
服务基本上包含两种状态:
状态
描述
StartedAndroid的应用程序组件,如活动,通过startService()启动了服务,则服务是Started状态。一旦启动,服务可以在后台无限期运行,即使启动它的组件已经被销毁。
Bound当Android的应用程序组件通过bindService()绑定了服务,则服务是Bound状态。Bound状态的服务提供了一个客户服务器接口来允许组件与服务进行交互,如发送请求,获取结果,甚至通过IPC来进行跨进程通信。
Service同样拥有生命周期,可以实现监控服务状态的变化,可以在合适的阶段执行工作。
Service包含以下回调:
回调
描述
onStartCommand()其他组件(如活动)通过调用startService()来请求启动服务时,系统调用该方法。如果你实现该方法,你有责任在工作完成时通过stopSelf()或者stopService()方法来停止服务。
onBind当其他组件想要通过bindService()来绑定服务时,系统调用该方法。如果你实现该方法,你需要返回IBinder对象来提供一个接口,以便客户来与服务通信。你必须实现该方法,如果你不允许绑定,则直接返回null。
onUnbind()当客户中断所有服务发布的特殊接口时,系统调用该方法。
onRebind()当新的客户端与服务连接,且此前它已经通过onUnbind(Intent)通知断开连接时,系统调用该方法。
onCreate()当服务通过onStartCommand()和onBind()被第一次创建的时候,系统调用该方法。该调用要求执行一次性安装。
onDestroy()当服务不再有用或者被销毁时,系统调用该方法。你的服务需要实现该方法来清理任何资源,如线程,已注册的监听器,接收器等。
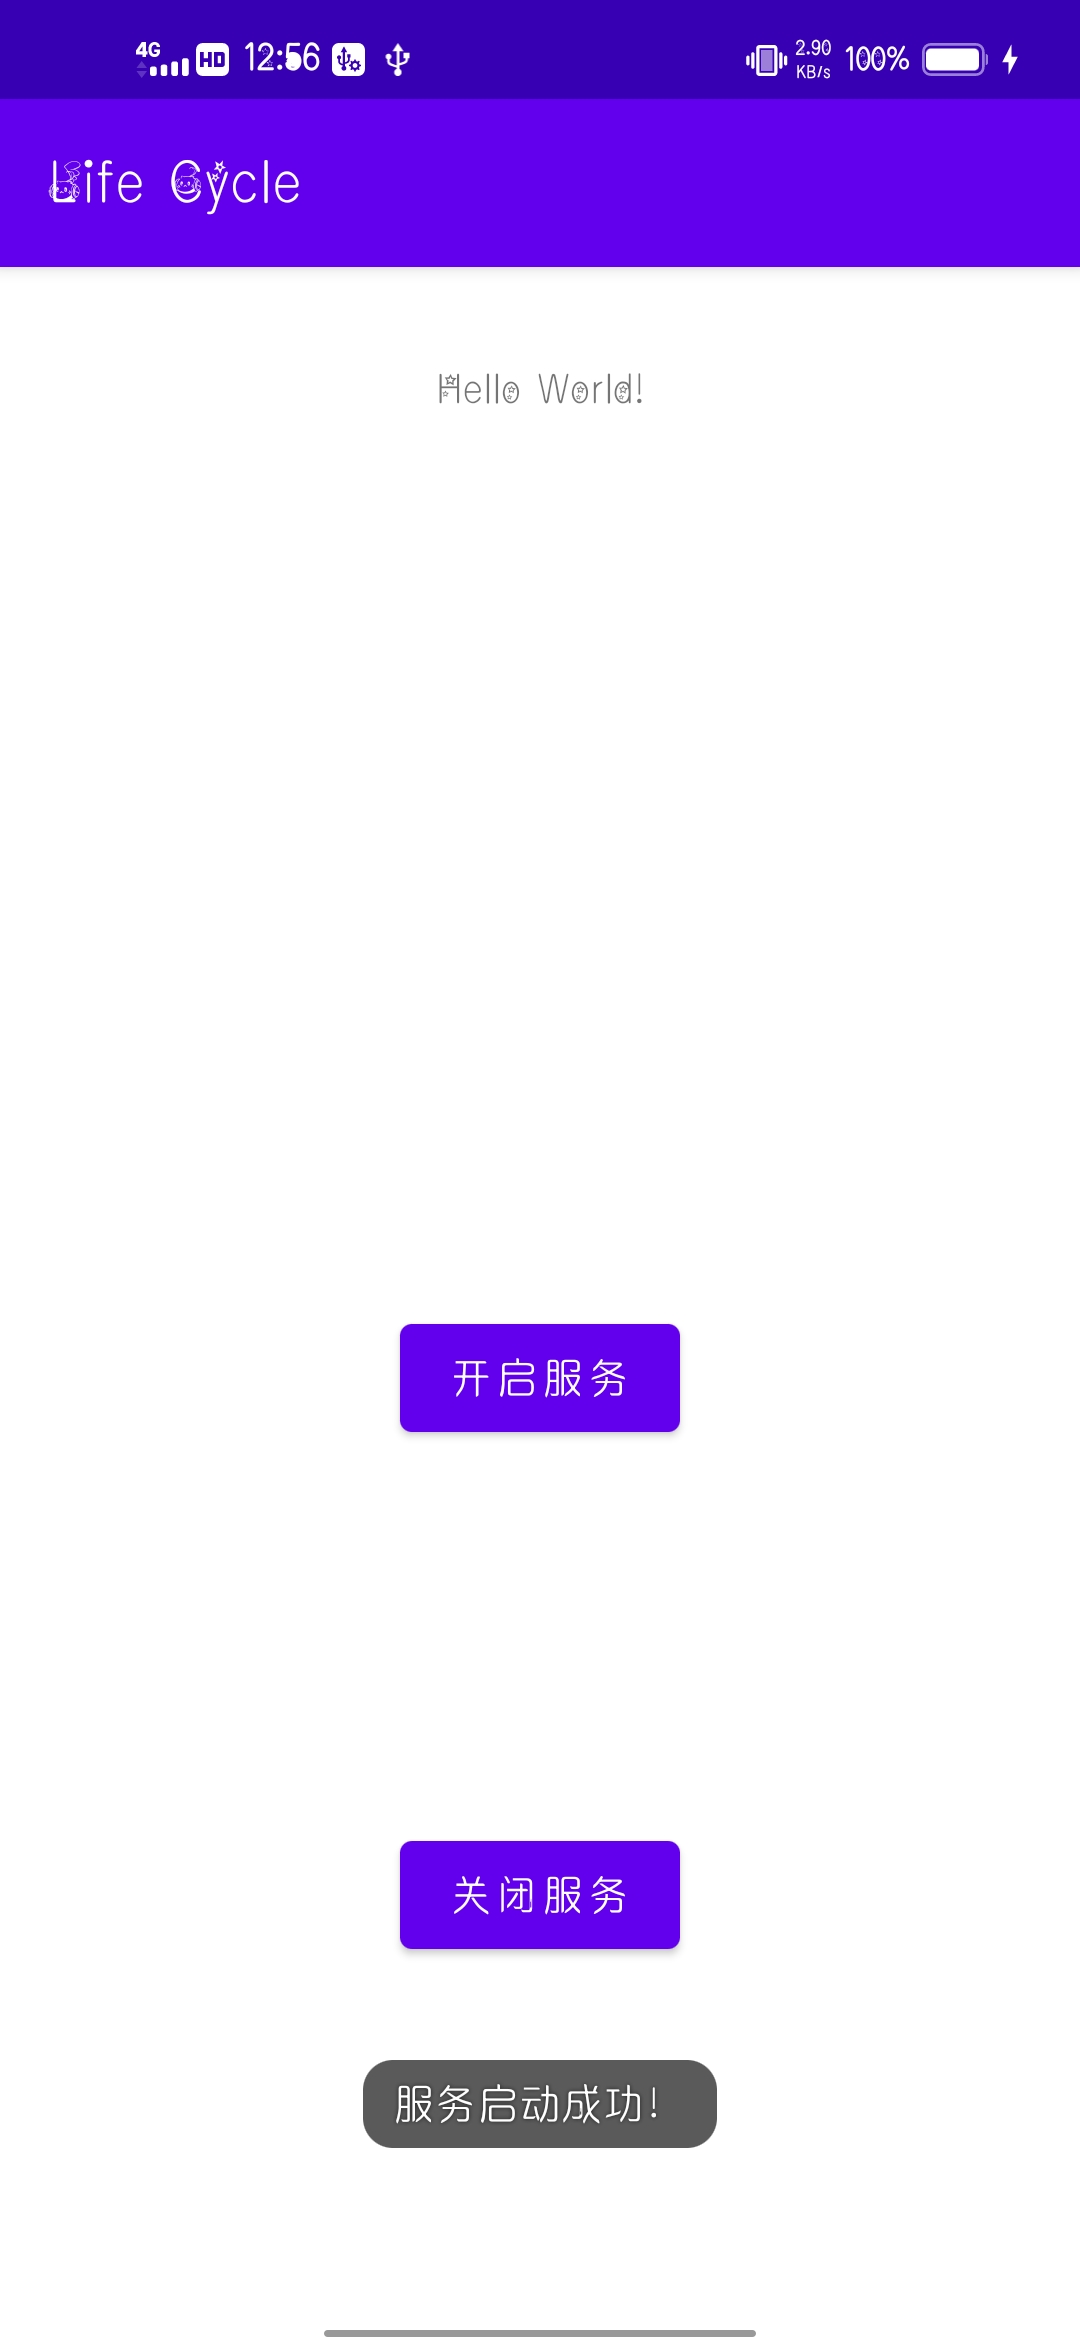
示例 一个简单的示例(自己写的):
1
2
3
4
5
6
7
8
9
10
11
12
13
14
15
16
17
18
19
20
21
22
23
package host.skyone.lifecycle;import androidx.appcompat.app.AppCompatActivity;import android.content.Intent;import android.os.Bundle;import android.view.View;public class MainActivity extends AppCompatActivity { @Override public void onCreate (Bundle savedInstanceState) { super .onCreate(savedInstanceState); setContentView(R.layout.activity_main); } public void startService (View view) { startService(new Intent (getBaseContext(), MyService.class)); } public void endService (View view) { stopService(new Intent (getBaseContext(), MyService.class)); } }
1
2
3
4
5
6
7
8
9
10
11
12
13
14
15
16
17
18
19
20
21
22
23
24
25
26
27
28
29
30
31
package host.skyone.lifecycle;import android.app.Service;import android.content.Intent;import android.os.IBinder;import android.widget.Toast;public class MyService extends Service { public MyService () { } @Override public IBinder onBind (Intent intent) { return null ; } @Override public int onStartCommand (Intent intent, int flags, int startId) { Toast.makeText(this , "服务启动成功!" , Toast.LENGTH_LONG).show(); return START_STICKY; } @Override public void onDestroy () { super .onDestroy(); Toast.makeText(this , "服务关闭成功!" , Toast.LENGTH_LONG).show(); } }
1
2
3
4
5
6
7
8
9
10
11
12
13
14
15
16
17
18
19
20
21
22
23
24
25
26
27
28
29
30
31
32
33
34
35
36
37
38
39
40
41
<?xml version="1.0" encoding="utf-8" ?> <androidx.constraintlayout.widget.ConstraintLayout xmlns:android ="http://schemas.android.com/apk/res/android" xmlns:app ="http://schemas.android.com/apk/res-auto" xmlns:tools ="http://schemas.android.com/tools" android:layout_width ="match_parent" android:layout_height ="match_parent" tools:context =".MainActivity" > <TextView android:id ="@+id/textView" android:layout_width ="wrap_content" android:layout_height ="wrap_content" android:layout_marginTop ="32dp" android:text ="Hello World!" app:layout_constraintLeft_toLeftOf ="parent" app:layout_constraintRight_toRightOf ="parent" app:layout_constraintTop_toTopOf ="parent" /> <Button android:id ="@+id/button" android:layout_width ="wrap_content" android:layout_height ="wrap_content" android:onClick ="startService" android:text ="@string/start_service" app:layout_constraintBottom_toBottomOf ="parent" app:layout_constraintEnd_toEndOf ="parent" app:layout_constraintStart_toStartOf ="parent" app:layout_constraintTop_toBottomOf ="@+id/textView" /> <Button android:id ="@+id/button2" android:layout_width ="wrap_content" android:layout_height ="wrap_content" android:onClick ="endService" android:text ="@string/end_service" app:layout_constraintBottom_toBottomOf ="parent" app:layout_constraintEnd_toEndOf ="parent" app:layout_constraintStart_toStartOf ="parent" app:layout_constraintTop_toBottomOf ="@+id/button" /> </androidx.constraintlayout.widget.ConstraintLayout >
1 2 3 4 5 <resources > <string name ="app_name" > Life Cycle</string > <string name ="start_service" > 开启服务</string > <string name ="end_service" > 关闭服务</string > </resources >
1
2
3
4
5
6
7
8
9
10
11
12
13
14
15
16
17
18
19
20
21
22
23
24
25
26
<?xml version="1.0" encoding="utf-8" ?> <manifest xmlns:android ="http://schemas.android.com/apk/res/android" package ="host.skyone.lifecycle" > <application android:allowBackup ="true" android:icon ="@mipmap/ic_launcher" android:label ="@string/app_name" android:roundIcon ="@mipmap/ic_launcher_round" android:supportsRtl ="true" android:theme ="@style/Theme.LifeCycle" > <service android:name =".MyService" android:enabled ="true" android:exported ="false" /> <activity android:name =".MainActivity" > <intent-filter > <action android:name ="android.intent.action.MAIN" /> <category android:name ="android.intent.category.LAUNCHER" /> </intent-filter > </activity > </application > </manifest >
运行!分别按两个按钮:
BroadcastReceiver
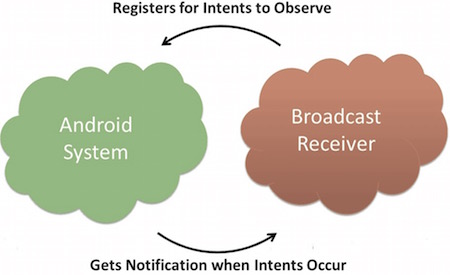
借助广播接收器 组件,系统能够在常规用户流之外向应用传递事件,从而允许应用响应系统范围内的广播通知。由于广播接收器是另一个明确定义的应用入口,因此系统甚至可以向当前未运行的应用传递广播。例如,应用可通过调度提醒来发布通知,以告知用户即将发生的事件。而且,通过将该提醒传递给应用的广播接收器,应用在提醒响起之前即无需继续运行。许多广播均由系统发起,例如,通知屏幕已关闭、电池电量不足或已拍摄照片的广播。应用也可发起广播,例如,通知其他应用某些数据已下载至设备,并且可供其使用。尽管广播接收器不会显示界面,但其可以创建状态栏通知,在发生广播事件时提醒用户。但广播接收器更常见的用途只是作为通向其他组件的通道 ,旨在执行极少量的工作。例如,它可能会根据带 JobScheduler 的事件调度 JobService 来执行某项工作
——Android官方文档
简介 就像我们现实生活中的广播接收器一样,BroadcastReceiver就是用来接收系统或其他Activity放出的广播消息的。这也是不同Activity间相互通信的桥梁。
下表是一些系统广播出来的事件:
事件常量
描述
android.intent.action.BATTERY_CHANGED持久的广播,包含电池的充电状态,级别和其他信息。
android.intent.action.BATTERY_LOW标识设备的低电量条件。
android.intent.action.BATTERY_OKAY标识电池在电量低之后,现在已经好了。
android.intent.action.BOOT_COMPLETED在系统完成启动后广播一次。
android.intent.action.BUG_REPORT显示报告bug的活动。
android.intent.action.CALL执行呼叫数据指定的某人。
android.intent.action.CALL_BUTTON用户点击”呼叫”按钮打开拨号器或者其他拨号的合适界面。
android.intent.action.DATE_CHANGED日期发生改变。
android.intent.action.REBOOT设备重启。
实现一个简单的广播接收器需要:
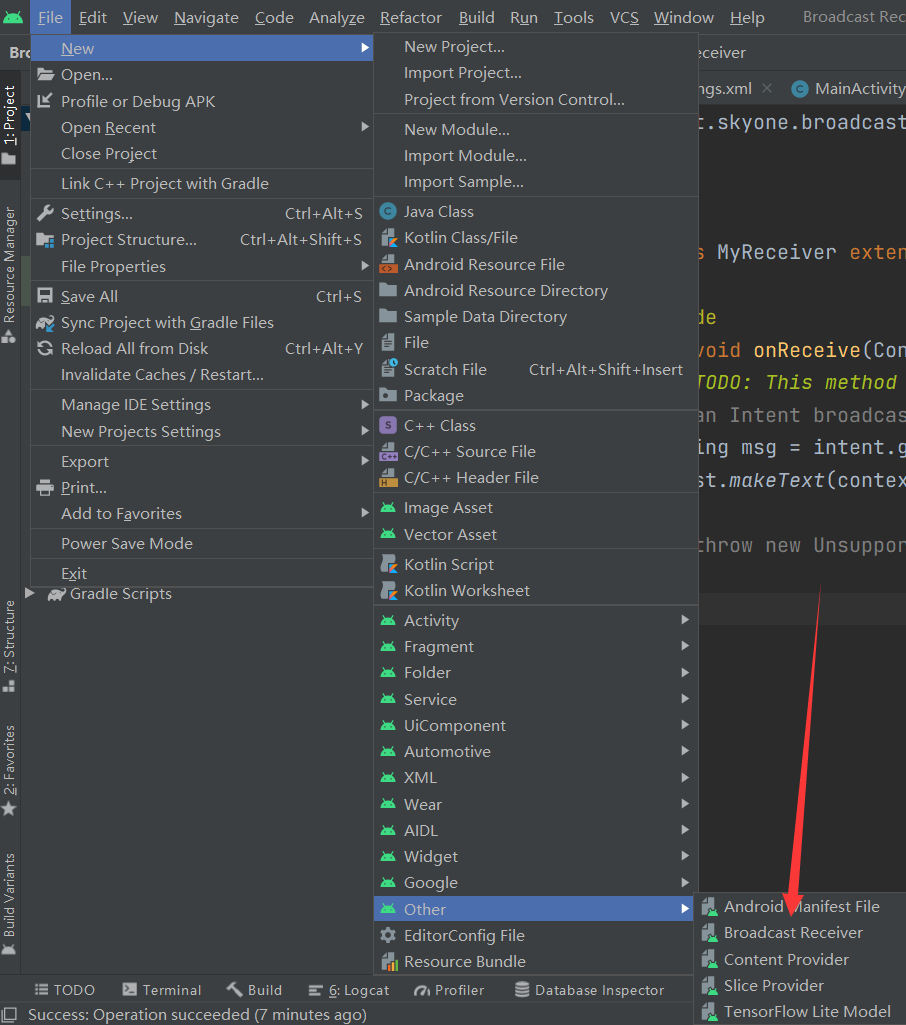
如果使用Android Studio,在创建广播接收器后IDE会自动在AndroidManifest.xml注册广播接收器
示例 老规矩,下面由一个例子来展示如何用广播传输Intent
1
2
3
4
5
6
7
8
9
10
11
12
13
14
15
16
17
18
19
20
21
22
23
24
25
26
package host.skyone.broadcastreceiver;import androidx.appcompat.app.AppCompatActivity;import android.content.Intent;import android.os.Bundle;import android.view.View;import android.widget.EditText;public class MainActivity extends AppCompatActivity { public static final String EXTRA_MESSAGE = "host.skyone.broadcastreceiver.MESSAGE" ; @Override protected void onCreate (Bundle savedInstanceState) { super .onCreate(savedInstanceState); setContentView(R.layout.activity_main); } public void sendMessage (View view) { EditText editText = (EditText) findViewById(R.id.editArea); String msg = editText.getText().toString(); Intent intent = new Intent (this , MyReceiver.class); intent.putExtra(EXTRA_MESSAGE, msg); sendBroadcast(intent); } }
1
2
3
4
5
6
7
8
9
10
11
12
13
14
15
16
17
18
19
20
21
22
23
24
25
26
27
28
29
30
31
<?xml version="1.0" encoding="utf-8" ?> <androidx.constraintlayout.widget.ConstraintLayout xmlns:android ="http://schemas.android.com/apk/res/android" xmlns:app ="http://schemas.android.com/apk/res-auto" xmlns:tools ="http://schemas.android.com/tools" android:layout_width ="match_parent" android:layout_height ="match_parent" tools:context =".MainActivity" > <EditText android:id ="@+id/editArea" android:layout_width ="250dp" android:layout_height ="45dp" android:ems ="10" android:inputType ="textPersonName" android:text ="@string/edit_area" app:layout_constraintBottom_toTopOf ="@+id/button" app:layout_constraintEnd_toEndOf ="parent" app:layout_constraintStart_toStartOf ="parent" app:layout_constraintTop_toTopOf ="parent" /> <Button android:id ="@+id/button" android:layout_width ="wrap_content" android:layout_height ="wrap_content" android:onClick ="sendMessage" android:text ="@string/send_msg" app:layout_constraintBottom_toBottomOf ="parent" app:layout_constraintEnd_toEndOf ="parent" app:layout_constraintStart_toStartOf ="parent" app:layout_constraintTop_toTopOf ="parent" /> </androidx.constraintlayout.widget.ConstraintLayout >
1
2
3
4
5
6
7
8
9
10
11
12
13
14
15
16
package host.skyone.broadcastreceiver;import android.content.BroadcastReceiver;import android.content.Context;import android.content.Intent;import android.widget.Toast;public class MyReceiver extends BroadcastReceiver { @Override public void onReceive (Context context, Intent intent) { String msg = intent.getStringExtra(MainActivity.EXTRA_MESSAGE); Toast.makeText(context,"侦测到广播信息:" + msg, Toast.LENGTH_LONG).show(); } }
1 2 3 4 5 <resources > <string name ="app_name" > 测试广播接收器</string > <string name ="send_msg" > 发送广播</string > <string name ="edit_area" > 输入信息</string > </resources >
1
2
3
4
5
6
7
8
9
10
11
12
13
14
15
16
17
18
19
20
21
22
23
24
25
26
27
28
29
<?xml version="1.0" encoding="utf-8" ?> <manifest xmlns:android ="http://schemas.android.com/apk/res/android" xmlns:tools ="http://schemas.android.com/tools" package ="host.skyone.broadcastreceiver" > <application android:allowBackup ="true" android:icon ="@mipmap/ic_launcher" android:label ="@string/app_name" android:roundIcon ="@mipmap/ic_launcher_round" android:supportsRtl ="true" android:theme ="@style/Theme.BroadcastReceiver" > <receiver android:name =".MyReceiver" android:enabled ="true" android:exported ="true" android:permission ="TODO" tools:ignore ="ExportedReceiver" /> <activity android:name =".MainActivity" > <intent-filter > <action android:name ="android.intent.action.MAIN" /> <category android:name ="android.intent.category.LAUNCHER" /> </intent-filter > </activity > </application > </manifest >
同样的,编译,测试,成功!
内容提供程序
内容提供程序 管理一组共享的应用数据,您可以将这些数据存储在文件系统、SQLite 数据库、网络中或者您的应用可访问的任何其他持久化存储位置。其他应用可通过内容提供程序查询或修改数据(如果内容提供程序允许)。例如,Android 系统可提供管理用户联系人信息的内容提供程序。因此,任何拥有适当权限的应用均可查询内容提供程序(如 ContactsContract.Data),以读取和写入特定人员的相关信息。我们很容易将内容提供程序看作数据库上的抽象,因为其内置的大量 API 和支持时常适用于这一情况。但从系统设计的角度看,二者的核心目的不同。对系统而言,内容提供程序是应用的入口点,用于发布由 URI 架构识别的已命名数据项。因此,应用可以决定如何将其包含的数据映射到 URI 命名空间,进而将这些 URI 分发给其他实体。反之,这些实体也可使用分发的 URI 来访问数据。在管理应用的过程中,系统可以执行以下特殊操作:
分配 URI 无需应用保持运行状态,因此 URI 可在其所属的应用退出后继续保留。当系统必须从相应的 URI 检索应用数据时,系统只需确保所属应用仍处于运行状态。
这些 URI 还会提供重要的细粒度安全模型。例如,应用可将其所拥有图像的 URI 放到剪贴板上,但将其内容提供程序锁定,以便其他应用程序无法随意访问它。当第二个应用尝试访问剪贴板上的 URI 时,系统可允许该应用通过临时的 URI 授权 来访问数据,这样便只能访问 URI 后面的数据,而非第二个应用中的其他任何内容。
内容提供程序也适用于读取和写入您的应用不共享的私有数据。
——Android官方文档
简介 官网说得比较简单,但做起来。。。有点难度
简单来说:内容提供者管理来自网络、SQLite数据库、文件、其他应用的数据,并使app可以更方便的使用这些数据。比如,在应用程序之间共享数据。这时内容提供者变得非常有用。
内容提供程序的职责和数据库很像,你可以查询,编辑它的内容。创建内容提供程序你通常需要重写以下函数:
函数
作用
onCreate()当提供者被启动时调用
query()该方法从客户端接受请求。结果是返回指针(Cursor)对象
insert()该方法向内容提供者插入新的记录
delete()该方法从内容提供者中删除已存在的记录
update()该方法更新内容提供者中已存在的记录
getType()该方法为给定的URI返回元数据类型
很简单,就是增删改查嘛。
内容URI 想要从内容提供程序获取数据,需要指定数据的URI,形如:
1 <prefix>://<authority>/<data_type>/<id>
部分
说明
prefix前缀:一直被设置为content://
authority授权:指定内容提供者的名称,例如联系人,浏览器等。第三方的内容提供者可以是全名,如:cn.programmer.statusprovider
data_type数据类型:这个表明这个特殊的内容提供者中的数据的类型。例如:你要通过内容提供者Contacts来获取所有的通讯录,数据路径是people,那么URI将是下面这样:content://contacts/people
id这个指定特定的请求记录。例如:你在内容提供者Contacts中查找联系人的ID号为5,那么URI看起来是这样:content://contacts/people/5
例如:我写了个程序host.skyone.test,要查询College里的students的第5条,URI为:
1 content://host.skyone.test.College/students/5
示例
1
2
3
4
5
6
7
8
9
10
11
12
13
14
15
16
17
18
19
20
21
22
23
24
25
26
27
28
29
30
31
32
33
34
35
36
37
38
39
40
41
42
43
44
45
46
47
48
49
50
51
52
53
54
55
56
57
58
package host.skyone.contentprovider;import androidx.appcompat.app.AppCompatActivity;import android.content.ContentValues;import android.database.Cursor;import android.net.Uri;import android.os.Bundle;import android.view.View;import android.widget.EditText;import android.widget.Toast;public class MainActivity extends AppCompatActivity { @Override protected void onCreate (Bundle savedInstanceState) { super .onCreate(savedInstanceState); setContentView(R.layout.activity_main); } public void onClickAddStudent (View view) { ContentValues values = new ContentValues (); values.put(StudentProvider.NAME, ((EditText) findViewById(R.id.nameEditText)).getText().toString()); values.put(StudentProvider.SEX, ((EditText) findViewById(R.id.sexEditText)).getText().toString()); Uri uri = getContentResolver().insert(StudentProvider.CONTENT_URI, values); Toast.makeText(getBaseContext(), uri.toString(), Toast.LENGTH_LONG).show(); } public void onClickSearchStudent (View view) { String URL = "content://host.skyone.contentprovider.College/students" ; Uri students = Uri.parse(URL); Cursor cursor = getContentResolver().query(students, null , null , null , "name" ); if (cursor.moveToFirst()) { do { Toast.makeText(this , cursor.getString(cursor.getColumnIndex(StudentProvider._ID)) + ", " + cursor.getString(cursor.getColumnIndex( StudentProvider.NAME)) + ", " + cursor.getString(cursor.getColumnIndex( StudentProvider.SEX)), Toast.LENGTH_SHORT).show(); } while (cursor.moveToNext()); } cursor.close(); } public void onClickDeleteStudent (View view) { String URL = "content://host.skyone.contentprovider.College/students" ; Uri students = Uri.parse(URL); getContentResolver().delete(Uri.parse(URL), "" , null ); } }
1
2
3
4
5
6
7
8
9
10
11
12
13
14
15
16
17
18
19
20
21
22
23
24
25
26
27
28
29
30
31
32
33
34
35
36
37
38
39
40
41
42
43
44
45
46
47
48
49
50
51
52
53
54
55
56
57
58
59
60
61
62
63
64
65
66
67
68
69
70
71
72
73
74
75
76
77
78
79
80
81
82
83
84
85
86
87
88
89
90
91
92
93
94
95
96
97
98
99
100
101
102
103
104
105
106
107
108
109
110
111
112
113
114
115
116
117
118
119
120
121
122
123
124
125
126
127
128
129
130
131
132
133
134
135
136
137
138
139
140
141
142
143
144
145
146
147
148
149
150
151
152
153
154
155
156
157
158
159
160
161
162
163
164
165
166
167
168
169
170
171
172
173
174
175
176
177
178
179
180
181
182
183
184
package host.skyone.contentprovider;import android.content.ContentProvider;import android.content.ContentValues;import android.content.Context;import android.content.ContentUris;import android.content.UriMatcher;import android.database.Cursor;import android.database.sqlite.SQLiteDatabase;import android.database.sqlite.SQLiteException;import android.database.sqlite.SQLiteOpenHelper;import android.database.sqlite.SQLiteQueryBuilder;import android.net.Uri;import android.text.TextUtils;import java.util.HashMap;public class StudentProvider extends ContentProvider { public static final String PROVIDER_NAME = "host.skyone.contentprovider.College" ; public static final String URL = "content://" + PROVIDER_NAME + "/students" ; public static final Uri CONTENT_URI = Uri.parse(URL); public static final String _ID = "_id" ; public static final String NAME = "name" ; public static final String SEX = "sex" ; private HashMap<String, String> STUDENT_PROJECTION_MAP; public static final int STUDENTS = 1 ; public static final int STUDENT_ID = 2 ; public static final UriMatcher uriMatcher; static { uriMatcher = new UriMatcher (UriMatcher.NO_MATCH); uriMatcher.addURI(PROVIDER_NAME, "students" , STUDENTS); uriMatcher.addURI(PROVIDER_NAME, "students/#" , STUDENT_ID); } private SQLiteDatabase db; static final String DATABASE_NAME = "College" ; static final String STUDENTS_TABLE_NAME = "students" ; static final int DATABASE_VERSION = 2 ; static final String CREATE_DB_TABLE = " CREATE TABLE " + STUDENTS_TABLE_NAME + " (_id INTEGER PRIMARY KEY AUTOINCREMENT, " + " name TEXT NOT NULL, " + " sex TEXT NOT NULL);" ; private static class DatabaseHelper extends SQLiteOpenHelper { DatabaseHelper(Context content) { super (content, DATABASE_NAME, null , DATABASE_VERSION); } @Override public void onCreate (SQLiteDatabase db) { db.execSQL(CREATE_DB_TABLE); } @Override public void onUpgrade (SQLiteDatabase db, int oldVersion, int newVersion) { db.execSQL("DROP TABLE IF EXISTS " + STUDENTS_TABLE_NAME); onCreate(db); } } public StudentProvider () { } @Override public boolean onCreate () { Context context = getContext(); DatabaseHelper databaseHelper = new DatabaseHelper (context); db = databaseHelper.getWritableDatabase(); return db != null ; } @Override public Uri insert (Uri uri, ContentValues values) { long rowID = db.insert(STUDENTS_TABLE_NAME, "" , values); if (rowID > 0 ) { Uri _uri = ContentUris.withAppendedId(CONTENT_URI, rowID); getContext().getContentResolver().notifyChange(_uri, null ); return uri; } throw new SQLiteException ("Failed to add a record into " + uri); } @Override public Cursor query (Uri uri, String[] projection, String selection, String[] selectionArgs, String sortOrder) { SQLiteQueryBuilder queryBuilder = new SQLiteQueryBuilder (); queryBuilder.setTables(STUDENTS_TABLE_NAME); switch (uriMatcher.match(uri)) { case STUDENTS: queryBuilder.setProjectionMap(STUDENT_PROJECTION_MAP); break ; case STUDENT_ID: queryBuilder.appendWhere(_ID + "=" + uri.getPathSegments().get(1 )); break ; default : throw new IllegalArgumentException ("Unknown URI " + uri); } if (sortOrder == null || sortOrder.equals("" )) { sortOrder = NAME; } Cursor cursor = queryBuilder.query(db, projection, selection, selectionArgs, null , null , sortOrder); cursor.setNotificationUri(getContext().getContentResolver(), uri); return cursor; } @Override public int delete (Uri uri, String selection, String[] selectionArgs) { int count = 0 ; switch (uriMatcher.match(uri)) { case STUDENTS: count = db.delete(STUDENTS_TABLE_NAME, selection, selectionArgs); break ; case STUDENT_ID: String id = uri.getPathSegments().get(1 ); count = db.delete(STUDENTS_TABLE_NAME, _ID + " = " + id + (!TextUtils.isEmpty(selection) ? " AND (" + selection + ')' : "" ), selectionArgs); break ; default : throw new IllegalArgumentException ("Unknown URI " + uri); } getContext().getContentResolver().notifyChange(uri, null ); return count; } @Override public int update (Uri uri, ContentValues values, String selection, String[] selectionArgs) { int count = 0 ; switch (uriMatcher.match(uri)) { case STUDENTS: count = db.update(STUDENTS_TABLE_NAME, values, selection, selectionArgs); break ; case STUDENT_ID: count = db.update(STUDENTS_TABLE_NAME, values, _ID + " = " + uri.getPathSegments().get(1 ) + (!TextUtils.isEmpty(selection) ? " AND (" + selection + ')' : "" ), selectionArgs); break ; default : throw new IllegalArgumentException ("Unknown URI " + uri); } getContext().getContentResolver().notifyChange(uri, null ); return count; } @Override public String getType (Uri uri) { switch (uriMatcher.match(uri)) { case STUDENTS: return "vnd.android.cursor.dir/vnd.example.students" ; case STUDENT_ID: return "vnd.android.cursor.item/vnd.example.students" ; default : throw new IllegalArgumentException ("Unsupported URI: " + uri); } } }
1
2
3
4
5
6
7
8
9
10
11
12
13
14
15
16
17
18
19
20
21
22
23
24
25
26
27
<?xml version="1.0" encoding="utf-8" ?> <manifest xmlns:android ="http://schemas.android.com/apk/res/android" package ="host.skyone.contentprovider" > <application android:allowBackup ="true" android:icon ="@mipmap/ic_launcher" android:label ="@string/app_name" android:roundIcon ="@mipmap/ic_launcher_round" android:supportsRtl ="true" android:theme ="@style/Theme.ContentProvider" > <provider android:name =".StudentProvider" android:authorities ="host.skyone.contentprovider.College" android:enabled ="true" android:exported ="false" /> <activity android:name =".MainActivity" > <intent-filter > <action android:name ="android.intent.action.MAIN" /> <category android:name ="android.intent.category.LAUNCHER" /> </intent-filter > </activity > </application > </manifest >
1
2
3
4
5
6
7
8
9
10
11
12
13
14
15
16
17
18
19
20
21
22
23
24
25
26
27
28
29
30
31
32
33
34
35
36
37
38
39
40
41
42
43
44
45
46
47
48
49
50
51
52
53
54
55
56
57
58
59
60
61
62
63
64
65
66
67
68
69
70
71
72
73
74
75
76
77
78
79
80
81
82
83
84
85
86
87
88
<?xml version="1.0" encoding="utf-8" ?> <androidx.constraintlayout.widget.ConstraintLayout xmlns:android ="http://schemas.android.com/apk/res/android" xmlns:app ="http://schemas.android.com/apk/res-auto" xmlns:tools ="http://schemas.android.com/tools" android:layout_width ="match_parent" android:layout_height ="match_parent" tools:context =".MainActivity" > <EditText android:id ="@+id/nameEditText" android:layout_width ="wrap_content" android:layout_height ="wrap_content" android:layout_marginStart ="32dp" android:layout_marginBottom ="30dp" android:ems ="10" android:inputType ="textPersonName" android:text ="" app:layout_constraintBottom_toTopOf ="@+id/sexEditText" app:layout_constraintEnd_toEndOf ="parent" app:layout_constraintStart_toStartOf ="parent" /> <EditText android:id ="@+id/sexEditText" android:layout_width ="wrap_content" android:layout_height ="wrap_content" android:layout_marginStart ="32dp" android:ems ="10" android:inputType ="textPersonName" android:text ="" app:layout_constraintBottom_toBottomOf ="parent" app:layout_constraintEnd_toEndOf ="parent" app:layout_constraintStart_toStartOf ="parent" app:layout_constraintTop_toTopOf ="parent" /> <Button android:id ="@+id/button" android:layout_width ="wrap_content" android:layout_height ="wrap_content" android:layout_marginStart ="30dp" android:layout_marginTop ="30dp" android:onClick ="onClickAddStudent" android:text ="@string/add" app:layout_constraintStart_toStartOf ="parent" app:layout_constraintTop_toBottomOf ="@+id/sexEditText" /> <Button android:id ="@+id/button2" android:layout_width ="wrap_content" android:layout_height ="wrap_content" android:layout_marginTop ="30dp" android:onClick ="onClickSearchStudent" android:text ="@string/search" app:layout_constraintEnd_toStartOf ="@+id/button3" app:layout_constraintStart_toEndOf ="@+id/button" app:layout_constraintTop_toBottomOf ="@+id/sexEditText" /> <TextView android:id ="@+id/nameTextView" android:layout_width ="wrap_content" android:layout_height ="wrap_content" android:layout_marginBottom ="54dp" android:text ="@string/name" app:layout_constraintBottom_toTopOf ="@id/sexTextView" app:layout_constraintEnd_toStartOf ="@+id/nameEditText" app:layout_constraintStart_toStartOf ="parent" /> <TextView android:id ="@+id/sexTextView" android:layout_width ="wrap_content" android:layout_height ="wrap_content" android:text ="@string/sex" app:layout_constraintBottom_toBottomOf ="parent" app:layout_constraintEnd_toStartOf ="@+id/sexEditText" app:layout_constraintStart_toStartOf ="parent" app:layout_constraintTop_toTopOf ="parent" /> <Button android:id ="@+id/button3" android:layout_width ="wrap_content" android:layout_height ="wrap_content" android:layout_marginTop ="30dp" android:layout_marginEnd ="30dp" android:onClick ="onClickDeleteStudent" android:text ="@string/delete" app:layout_constraintEnd_toEndOf ="parent" app:layout_constraintTop_toBottomOf ="@+id/sexEditText" /> </androidx.constraintlayout.widget.ConstraintLayout >
1 2 3 4 5 6 7 8 <resources > <string name ="app_name" > 内容提供者测试</string > <string name ="name" > 姓名</string > <string name ="sex" > 性别</string > <string name ="add" > 添加</string > <string name ="search" > 查询</string > <string name ="delete" > 删除</string > </resources >
提示 :
这一次的应用退出后数据仍然可以保存,如果误操作导致数据库里的数据表不正确,可以清除应用数据或者修改数据库版本号