为了学习GitHub Actions的基本使用,写一个爬虫练练手
这个爬虫用于下载哔哩哔哩相簿的图片
该文章分为三步:
- 写爬虫
- 写workflows文件
- 上传代码到GitHub
写一个scrapy爬虫
创建项目
新建一个项目文件夹,打开CMD并切换到该文件夹,输入以下命令初始化git:
使用scrapy新建项目并新建爬虫:
1
2
3
| scrapy startproject bili bilibili.com
cd bili
scrapy genspider picture
|
创建项目完毕,下面使用IDE打开项目文件夹吧~
我使用的是Pycharm
储存图片信息的class
打开bili/items.py,不出意外的话,这里已经有一个BiliItem(scrapy.Item)类了
我们将其改为:
1
2
3
4
5
6
7
8
9
10
11
| import scrapy
class BiliItem(scrapy.Item):
url = scrapy.Field()
title = scrapy.Field()
author = scrapy.Field()
id = scrapy.Field()
uid = scrapy.Field()
extension = scrapy.Field()
|
分析哔哩哔哩API
打开哔哩哔哩相簿,开启检查元素的网络那一栏,发现每加载一次都会有一个get请求:
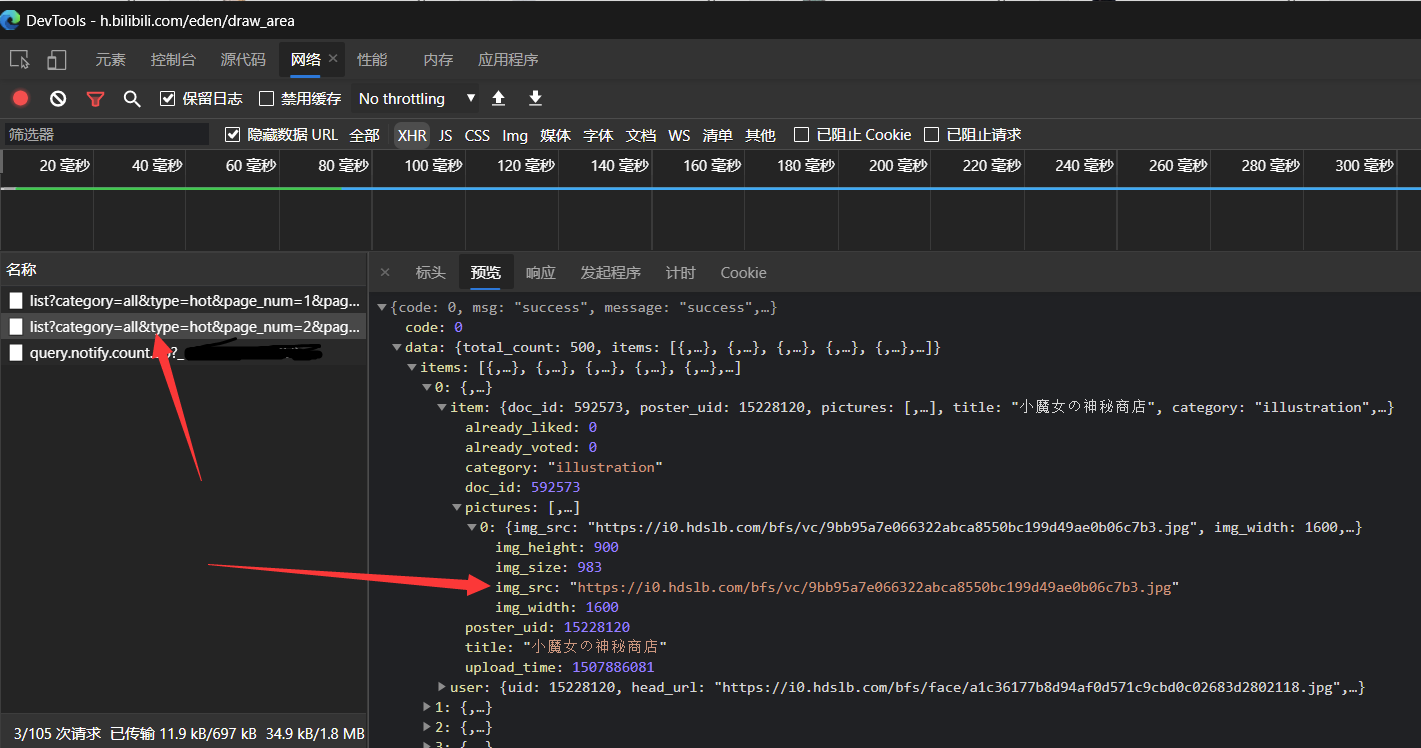
很好,正是我们想要的,多次尝试,很容易分析出来:
1
2
| GET https://api.vc.bilibili.com/link_draw/v2/Doc/list?category=all&type=hot&page_num=0&page_size=20
Accept: application/json
|
返回:
1
2
3
4
5
6
7
8
9
10
11
12
13
14
15
16
17
18
19
20
21
22
23
24
25
26
27
28
29
30
31
32
33
34
35
36
37
38
39
40
41
42
43
44
45
46
47
48
49
50
51
52
53
54
55
56
57
58
| GET https://api.vc.bilibili.com/link_draw/v2/Doc/list?category=all&type=hot&page_num=0&page_size=20
HTTP/1.1 200 OK
Date: Sun, 21 Mar 2021 06:30:48 GMT
Content-Type: application/json
Transfer-Encoding: chunked
Connection: keep-alive
L: v
X-Trace-Id: 29bd4f5ef5186679
Http-Status-Code: 200
Bili-Status-Code: 0
Server: swoole-http-server
Set-Cookie: l=v
Expires: Sun, 21 Mar 2021 06:30:47 GMT
Cache-Control: no-cache
X-Cache-Webcdn: BYPASS from hw-sh3-webcdn-08
{
"code": 0,
"msg": "success",
"message": "success",
"data": {
"total_count": 500,
"items": [
{
"user": {
"uid": 21690338,
"head_url": "https://i1.hdslb.com/bfs/face/b6a132c21e444401228099c8cc07edab810bc9db.jpg",
"name": "ZWPAN盼"
},
"item": {
"doc_id": 1085297,
"poster_uid": 21690338,
"pictures": [
{
"img_src": "https://i0.hdslb.com/bfs/album/2785de69bb019f85c88ee0d9681468c779e3950f.jpg",
"img_width": 3029,
"img_height": 9506,
"img_size": 6425
}
],
"title": "108个小电视表情",
"category": "illustration",
"upload_time": 1512023535,
"already_liked": 0,
"already_voted": 0
}
},
//////////////////////////////////
/ { /
/ "_": "太多了,就不列举了" /
/ } /
//////////////////////////////////
]
}
}
Response code: 200 (OK); Time: 490ms; Content length: 12879 bytes
|
写爬虫
先在项目的根目录创建一个配置文件setting.py
1
2
3
4
5
6
|
PICTURE_MAX_PAGE = 20
PICTURE_SLEEP_TIME = 0.5
PICTURE_CATEGORY = "all"
PICTURE_TYPE = "hot"
|
PICTURE_MAX_PAGE
爬的页数,每页20个
PICTURE_SELLP_TIME
每爬一张图间隔的时间
PICTURE_CATEGORY
要爬的图片的类型,选项如下
all:所有类型illustration:插画comic:漫画draw:其他
PICTURE_TYPE
排名规则。选项如下:
打开bili/spider/picture.py
导入一些库
1
2
3
4
5
| import json
import scrapy
import time
import setting
from bili.items import BiliItem
|
改写class PictureSpider(scrapy.Spider):
我们要先从https://h.bilibili.com/开始爬,从而免去设置Referer
1
| start_urls = ['https://h.bilibili.com/']
|
再接着循环爬取刚才分析的链接即可,记住要构造请求并设置回调函数哦!
1
2
3
4
5
6
7
8
9
10
11
12
13
14
15
16
17
18
19
20
21
22
23
| def parse(self, response, **kwargs):
for i in range(setting.PICTURE_MAX_PAGE):
yield scrapy.Request(
'https://api.vc.bilibili.com/link_draw/v2/Doc/list?page_size=20'
'&type=' + setting.PICTURE_TYPE +
'&category=' + setting.PICTURE_CATEGORY +
'&page_num=' + str(i),
callback=self.picture_info,
dont_filter=True
)
def picture_info(self, response, **kwargs):
data = json.loads(response.text)
for item in data["data"]["items"]:
img = BiliItem()
img["url"] = item["item"]["pictures"][-1]["img_src"]
img["title"] = item["item"]["title"]
img["id"] = item["item"]["doc_id"]
img["author"] = item["user"]["name"]
img["uid"] = item["user"]["uid"]
img["extension"] = img["url"].split('.')[-1]
yield img
time.sleep(setting.PICTURE_SLEEP_TIME)
|
bili/spiders/picture.py完整代码
1
2
3
4
5
6
7
8
9
10
11
12
13
14
15
16
17
18
19
20
21
22
23
24
25
26
27
28
29
30
31
32
33
34
35
36
| import json
import scrapy
import time
import setting
from bili.items import BiliItem
class PictureSpider(scrapy.Spider):
name = 'picture'
allowed_domains = ['bilibili.com']
start_urls = ['https://h.bilibili.com/']
def parse(self, response, **kwargs):
    for i in range(setting.PICTURE_MAX_PAGE):
        yield scrapy.Request(
            'https://api.vc.bilibili.com/link_draw/v2/Doc/list?page_size=20'
            '&type=' + setting.PICTURE_TYPE +
            '&category=' + setting.PICTURE_CATEGORY +
            '&page_num=' + str(i),
            callback=self.picture_info,
            dont_filter=True
        )

def picture_info(self, response, **kwargs):
    data = json.loads(response.text)
    for item in data["data"]["items"]:
        img = BiliItem()
        img["url"] = item["item"]["pictures"][-1]["img_src"]
        img["title"] = item["item"]["title"]
        img["id"] = item["item"]["doc_id"]
        img["author"] = item["user"]["name"]
        img["uid"] = item["user"]["uid"]
        img["extension"] = img["url"].split('.')[-1]
        yield img
        time.sleep(setting.PICTURE_SLEEP_TIME)
|
下载图片
图片链接已经使用上面的picture_info()方法获取了,下面使用BiliPipeline管道下载图片
打开bili/pipelines.py
由于scrapy自带的图片下载器个人觉得使用起来太麻烦,这里直接用requests库就好
1
2
3
4
5
6
7
8
9
10
11
12
13
| import requests
from os import path
class BiliPipeline:
def process_item(self, item, spider):
name = str(item["id"]) + '.' + item["extension"]
res = requests.get(item["url"])
with open(path.join(path.join(path.abspath('.'), 'image'), name), 'wb') as file:
file.write(res.content)
print(name)
return item
|
启用管道
打开bili/settings.py
找到以下内容并取消注释
1
2
3
| ITEM_PIPELINES = {
'bili.pipelines.BiliPipeline': 300,
}
|
在运行阶段为了减少不必要的log提示,可以在在里面添加
本地启动爬虫测试
启动爬虫
1
2
| # 切换到项目根目录
scrapy crawl picture
|
pycharm调试爬虫
点击右上角“编辑配置”
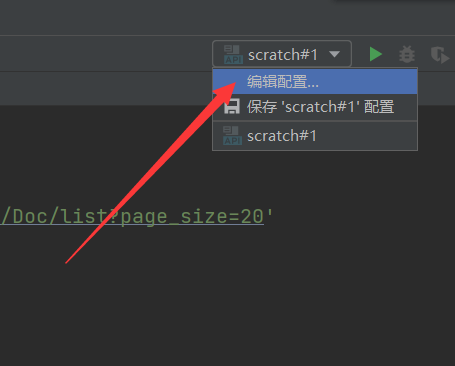
添加配置,选择python
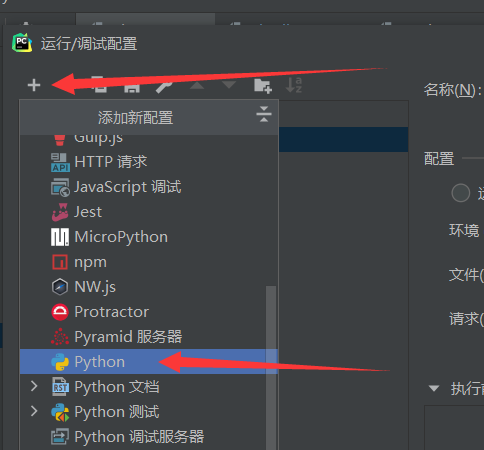
配置如下
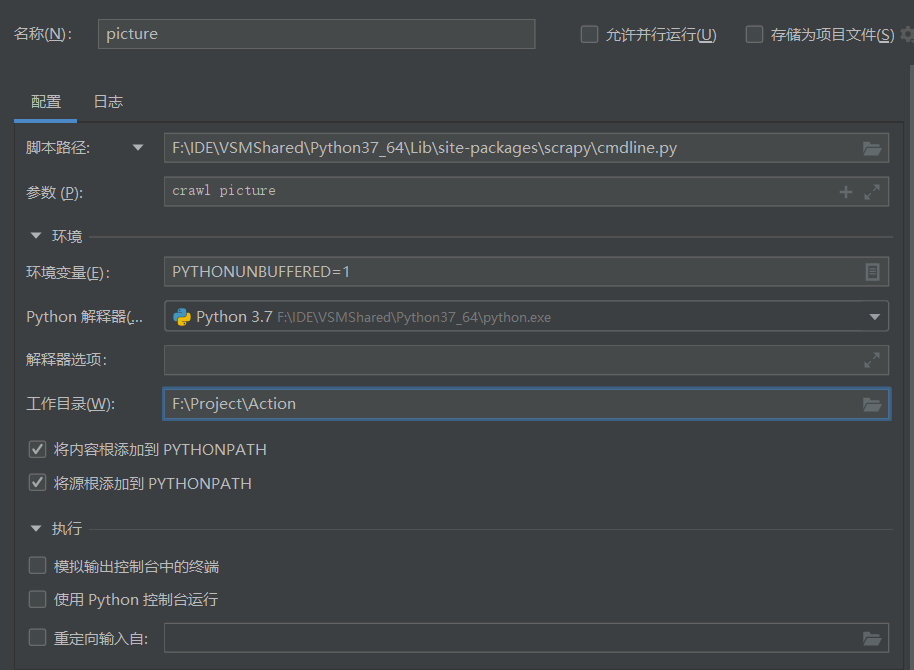
- 脚本路径为
python安装目录\Lib\site-packages\scrapy\cmdline.py
- 参数为
crawl 爬虫名
- 工作目录为项目根目录
然后就可以愉快的打断点调试了JetBrains NB
写workflows文件
在项目根目录创建:.github/workflows/blank.yml
直接复制粘贴即可,有时间我会另写一篇入门GitHub Actions的文章,可能会鸽,咕咕咕。。。其实网上有很多这样的文章,例如:阮一峰的网络日志
1
2
3
4
5
6
7
8
9
10
11
12
13
14
15
16
17
18
19
20
21
22
23
24
25
26
27
28
29
30
| name: Spider
on:
workflow_dispatch:
jobs:
spider:
runs-on: ubuntu-latest
steps:
- name: checkout
uses: actions/checkout@master
- name: 'Set up Python'
uses: actions/setup-python@v1
with:
python-version: 3.7
- name: Run a single-line script
run: |
pip install requests
pip install lxml
pip install scrapy
scrapy crawl picture
- name: Upload artifact
uses: actions/upload-artifact@master
with:
name: img
path: image
|
部署到GitHub Actions
在Github上新建仓库
将代码推送到该仓库里
Git三部曲:
1
2
3
| git add . # 添加
git commit -m "init" # 提交
git push # 推送
|
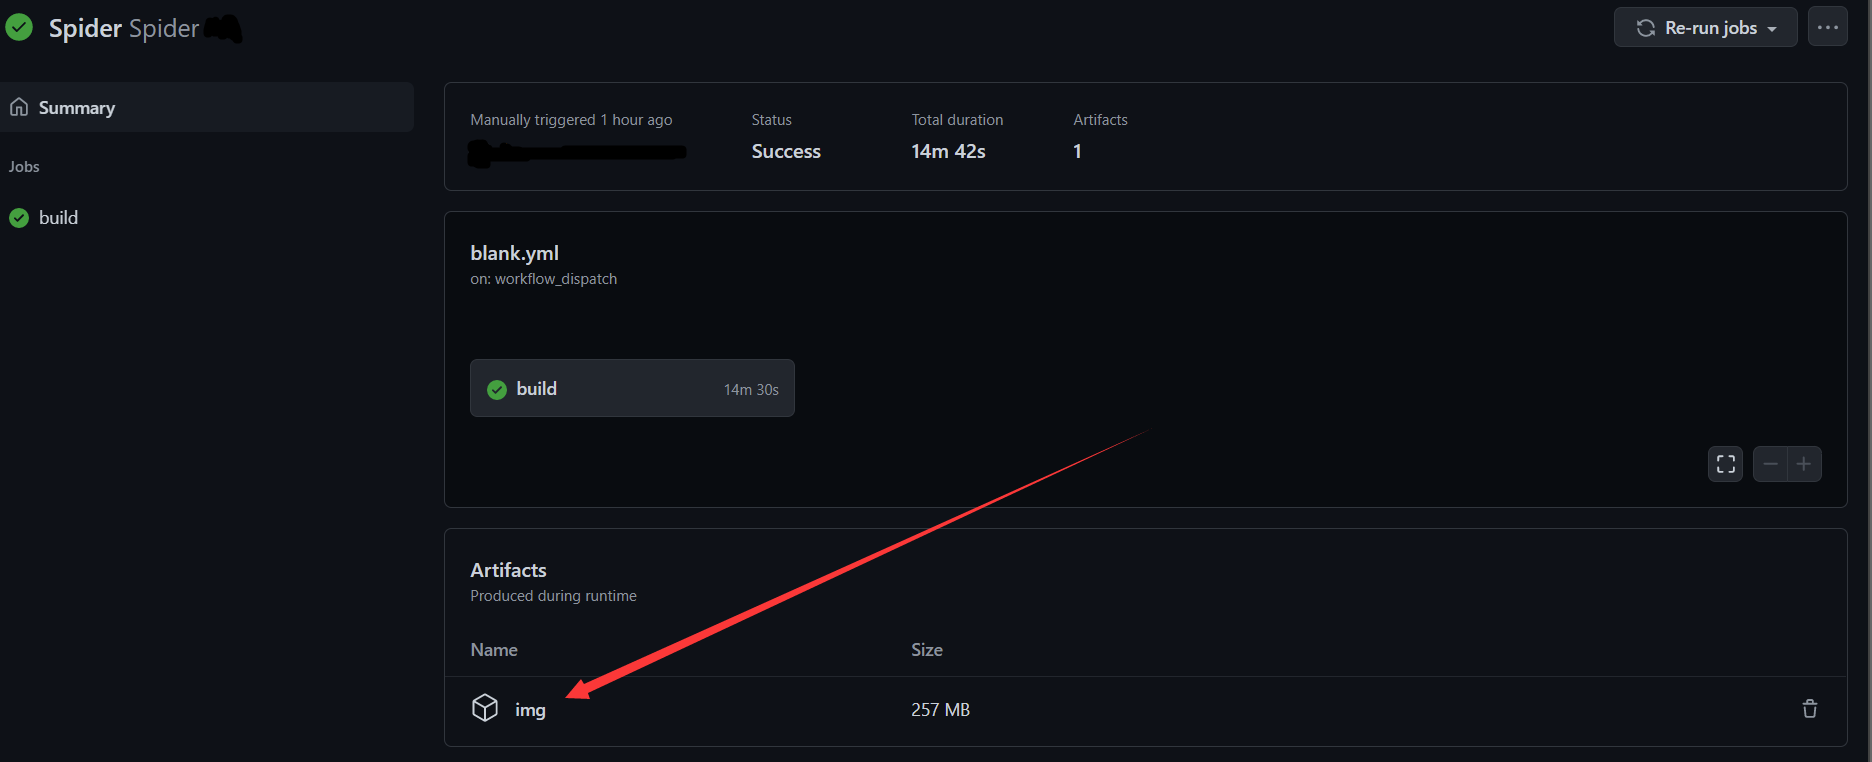
打开GitHub仓库网页
依次点击:
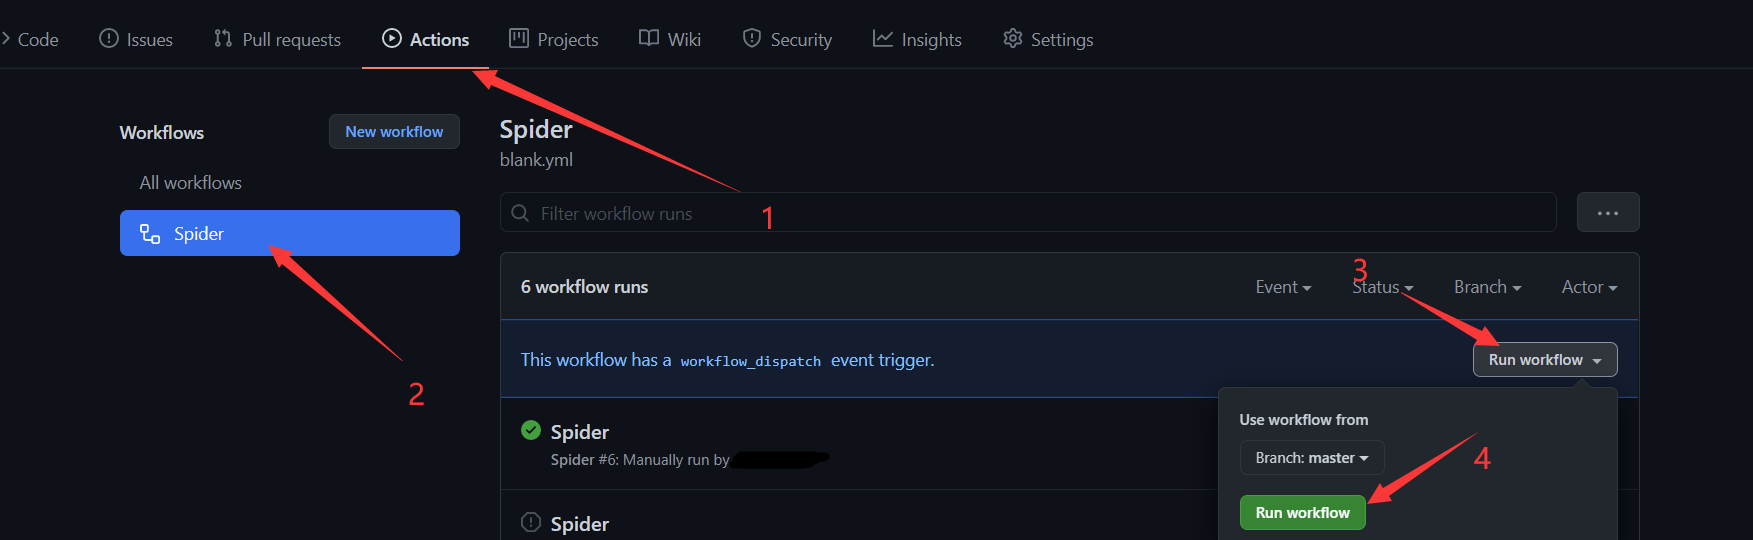
等待一小会,不出意外的话,爬虫的结果就显示出来了,点击下载即可