将Markdown渲染成HTML并自定义标记
Skyone
科技爱好者
Markdown是一种几乎万能的标记语言,它能让我们以简单的语法写出很好看的文章。但是markdown源码只是一串纯文本字符串,我们需要将他渲染成HTML、word、PDF等格式才能更好的供人阅读。下面我将记录一下我是如何使用 remark
一系列的库实现将 markdown 渲染成 HTML,并提供自定义标记。
为什么要使用 markdown ?
在日常生活中,如果想要记录点什么,大多数人要么选择纯文本的记事软件,要么使用World。当然,对于日常写写代码的我,在用过 markdown 语法后,马上就爱上了它,并一直在对周围的人安利。如果要问为什么,我认为有以下原因:
支持的平台多
无论是公共写作网站如知乎、CSDN、博客园、GitHub,或是私人部署的Hexo、Wordpress、Gitea等,都支持 markdown。这意味着你只需要写出一份原稿,就可以到处粘贴,到处发布。
语法简单
markdown 的语法非常简单,只需要记住几个符号就可以写出很好看的文章。链接、图片、表格、代码块、标题、列表等等,都可以用简单的符号来表示,而且符号的含义也很直观。这意味着你不需要花费大量的时间去学习它,只需要记住几个符号就可以了。
格式转换简单
通过 typora、pandoc、markdown-it 等工具,你可以将 markdown 转换成 HTML、Word、PDF、LaTeX、Epub、纯文本等格式。这意味着你可以将 markdown 转换成任何你想要的格式,而且转换的过程也非常简单。Typora 用起来真爽~
怎么将 markdown 渲染成 HTML?
我的目标是使用JavaScript将符合 GFM (GitHub Flavored Markdown) 规范的 markdown 渲染成 HTML,同时支持浏览器和Node.js。经过一番搜索,我找到了满足我要求的库:remark。
remark 是一个插件化的生态系统,它提供了一系列的插件,一步一步将 markdown 转换成 HTML。它的工作流程如下:
graph LR
    A(markdown文本) -->|remark - parse| B(markdown AST)
    B -->|remark - plugins| B
    B -->|remark - rehype| C(html AST)
    C -->|rehype - plugins| C
    C -->|rehype - stringify| D(HTML)
当然,它的功能远远不止如此,想要了解更多,你可以看看 unified.js。
废话不多说,让我们开始吧!
解析 markdown
首先,我们需要将 markdown
解析成 抽象语法树 (Abstract Syntax Tree, AST)
。这里我们使用 remark-parse 来完成这个工作。
首先,让我们安装依赖:
npm install unified remark-parse
-
unified: Unified 是一个通过AST语法树解析、检查、转换和序列化内容的接口。简而言之,它提供了一种统一的方式来处理 AST,就像 UNIX 的管道一样,每一步对 AST 进行一些处理,最后生成想要的内容。
-
remark-parse: 用于将 markdown 解析成 Markdown 的 AST。
import remarkParse from "remark-parse";
import {unified} from "unified";

unified()
    .use(remarkParse)
这些代码暂时还不能运行,先别着急哦~
经过这一步解析,我们得到了一个 AST,它的结构如下(省略了暂时用不上的 position 字段):
{
  "type": "root",
  "children": [
    {
      "type": "heading",
      "depth": 1,
      "children": [
        {
          "type": "text",
          "value": "Hello, world!"
        }
      ]
    }
  ]
}
将 markdown AST 转换成 HTML AST
接下来,我们需要将 markdown AST 转换成 HTML AST。这里我们使用 remark-rehype 这个插件。
使用如下命令来安装 remark-rehype:
npm install remark-rehype
与上面类似,将 render.js 修改为如下内容:
import remarkParse from "remark-parse";
import {unified} from "unified";
import remarkRehype from "remark-rehype";

unified()
    .use(remarkParse)
    .use(remarkRehype)
这样,我们就将 markdown AST 转换成了 HTML AST,下面是 HTML AST 的结构:
{
  "type": "root",
  "children": [
    {
      "type": "element",
      "tagName": "h1",
      "properties": {},
      "children": [
        {
          "type": "text",
          "value": "Hello, world!"
        }
      ]
    }
  ]
}
将 HTML AST 转换成 HTML
这一步也很简单,我们只需要使用 rehype-stringify 这个插件就可以了。
同样是先安装依赖:
npm install rehype-stringify
添加如下代码:
import rehypeStringify from "rehype-stringify";
import {unified} from "unified";
import remarkParse from "remark-parse";
import remarkRehype from "remark-rehype";

unified()
    .use(remarkParse)
    .use(remarkRehype)
    .use(rehypeStringify)
    .process("# Hello, world!")
    .then((file) => {
        console.log(file.toString());
    });
到这里就可以运行了,记得在 package.json 中添加 type: module,否则会报错。因为 unified 系列的库都只支持 ES Module。
{
  "type": "module",
  "dependencies": {
    "remark-parse": "^10.0.2",
    "remark-rehype": "^10.1.0",
    "rehype-stringify": "^9.0.3",
    "unified": "^10.1.2"
  }
}
如果一切顺利,你将看到如下输出:
<h1>Hello, world!</h1>
你也可以试着在这几个插件之间添加控制台打印的代码,看看它们的输出。
import rehypeStringify from "rehype-stringify";
import remarkParse from "remark-parse";
import remarkRehype from "remark-rehype";
import {unified} from "unified";


unified()
    .use(remarkParse)
    .use(() => (d) => {
        console.log(JSON.stringify(d, null, 2));
        return d;
    })
    .use(remarkRehype)
    .use(() => (d) => {
        console.log(JSON.stringify(d, null, 2));
        return d;
    })
    .use(rehypeStringify)
    .process("# Hello, world!")
    .then((file) => {
        console.log(file.toString());
    });
添加一些辅助性的插件
上面的代码已经可以将 markdown 渲染成 HTML 了,但是还有一些问题需要解决:
- 不支持 GFM
- markdown 没有样式
- 代码块没有高亮
- 不支持 公式
下面我们通过添加一些插件逐个解决这些问题。
添加 GFM 支持
首先,让我们实现对 GFM 语法的支持。这里我们使用 remark-gfm 这个插件。
引用一下库的介绍:
remark plugin to support GFM (autolink literals, footnotes, strikethrough, tables, tasklists). GitHub - remarkjs/remark-gfm
想要使用它也很简单,首先安装依赖:
npm install remark-gfm
就像一开始我给出的流程图中所展示的那样,我们只需要在 remark-parse 和 remark-rehype 之间添加 remark-gfm 就可以了。
import rehypeStringify from "rehype-stringify";
import remarkGfm from "remark-gfm";
import remarkParse from "remark-parse";
import remarkRehype from "remark-rehype";
import {unified} from "unified";
import {readFileSync} from "fs";

unified()
    .use(remarkParse)
    .use(remarkGfm)
    .use(remarkRehype)
    .use(rehypeStringify)
    .process(readFileSync("./test.md"))
    .then((file) => {
        console.log(file.toString());
    });
试着运行一下,下面是我运行的结果:
# GFM

## Autolink literals

www.example.com, https://example.com, and contact@example.com.

## Footnote

A note[^1]

[^1]: Big note.

## Strikethrough

~one~ or ~~two~~ tildes.

## Table

| a | b  |  c |  d  |
| - | :- | -: | :-: |

## Tasklist

* [ ] to do
* [x] done
<h1>GFM</h1>
<h2>Autolink literals</h2>
<p><a href="http://www.example.com">www.example.com</a>, <a href="https://example.com">https://example.com</a>, and <a href="mailto:contact@example.com">contact@example.com</a>.</p>
<h2>Footnote</h2>
<p>A note<sup><a href="#user-content-fn-1" id="user-content-fnref-1" data-footnote-ref aria-describedby="footnote-label">1</a></sup></p>
<h2>Strikethrough</h2>
<p><del>one</del> or <del>two</del> tildes.</p>
<h2>Table</h2>
<table>
<thead>
<tr>
<th>a</th>
<th align="left">b</th>
<th align="right">c</th>
<th align="center">d</th>
</tr>
</thead>
</table>
<h2>Tasklist</h2>
<ul class="contains-task-list">
<li class="task-list-item"><input type="checkbox" disabled> to do</li>
<li class="task-list-item"><input type="checkbox" checked disabled> done</li>
</ul>
<section data-footnotes class="footnotes"><h2 id="footnote-label" class="sr-only">Footnotes</h2>
<ol>
<li id="user-content-fn-1">
<p>Big note. <a href="#user-content-fnref-1" data-footnote-backref class="data-footnote-backref" aria-label="Back to content">↩</a></p>
</li>
</ol>
</section>
为 HTML 添加合适的 CSS
我们的目标是将 markdown 渲染成 HTML,但是我们的 HTML 没有样式,看起来很难看。所以我们需要为 HTML 添加一些合适的 CSS。我在 GitHub 上找到了一个和 GitHub 的样式很像的 CSS:sindresorhus/github-markdown-css。
这次我们直接将 remark 输出的内容包装一下,组成完整的 HTML,并写入到文件中。
备注
这里我使用了顶层
await,因此需要 Node.js 14+,并在 Node.js 启动参数中添加--experimental-top-level-await。此外,Node.js 20+ 中已经默认支持顶层await,无需添加启动参数。(2024年编辑)新版 Node.js 已经默认支持,不需要此参数了。
import rehypeStringify from "rehype-stringify";
import remarkGfm from "remark-gfm";
import remarkParse from "remark-parse";
import remarkRehype from "remark-rehype";
import {unified} from "unified";
import {readFile, writeFile} from "fs/promises";

const content = (await unified()
    .use(remarkParse)
    .use(remarkGfm)
    .use(remarkRehype)
    .use(rehypeStringify)
    .process(await readFile("./test.md"))).toString()

const html = `
<!DOCTYPE html>
<html lang="zh-CN">
    <head>
        <meta charset="UTF-8">
        <meta name="viewport" content="width=device-width, initial-scale=1.0">
        <title>Just for test</title>
        <link rel="stylesheet" href="https://cdn.jsdelivr.net/npm/github-markdown-css/github-markdown-light.min.css">
    </head>
    <body>
        <div class="markdown-body">
    ${content}
        </div>
    </body>
</html>
`

await writeFile("./test.html", html)
下面是效果图:

是不是好看多了?
为代码块添加高亮
rehype 中有一个叫 rehype-highlight 的插件,可以为代码块添加高亮。它是针对 HTML AST 的,因此我们需要在 remark-rehype
和 rehype-stringify 之间添加它。
// highlight-next-line
import rehypeHighlight from "rehype-highlight";
import rehypeStringify from "rehype-stringify";
import remarkGfm from "remark-gfm";
import remarkParse from "remark-parse";
import remarkRehype from "remark-rehype";
import {unified} from "unified";
import {readFile, writeFile} from "fs/promises";


const content = (await unified()
    .use(remarkParse)
    .use(remarkGfm)
    .use(remarkRehype)
    // highlight-next-line
    .use(rehypeHighlight)
    .use(rehypeStringify)
    .process(await readFile("./test.md"))).toString()
仅仅如此还不够,我们还需要引入 highlight.js 的样式文件。
// ......

const html = `
<!DOCTYPE html>
<html lang="zh-CN">
    <head>
        <meta charset="UTF-8">
        <meta name="viewport" content="width=device-width, initial-scale=1.0">
        <title>Just for test</title>
        <link rel="stylesheet" href="https://cdn.jsdelivr.net/npm/github-markdown-css/github-markdown-light.min.css">
        // highlight-next-line
        <link rel="stylesheet" href="https://cdn.jsdelivr.net/npm/highlight.js/styles/github.min.css">
    </head>
    <body>
        <div class="markdown-body">
    ${content}
        </div>
    </body>
</html>
`
这下代码有颜色啦~
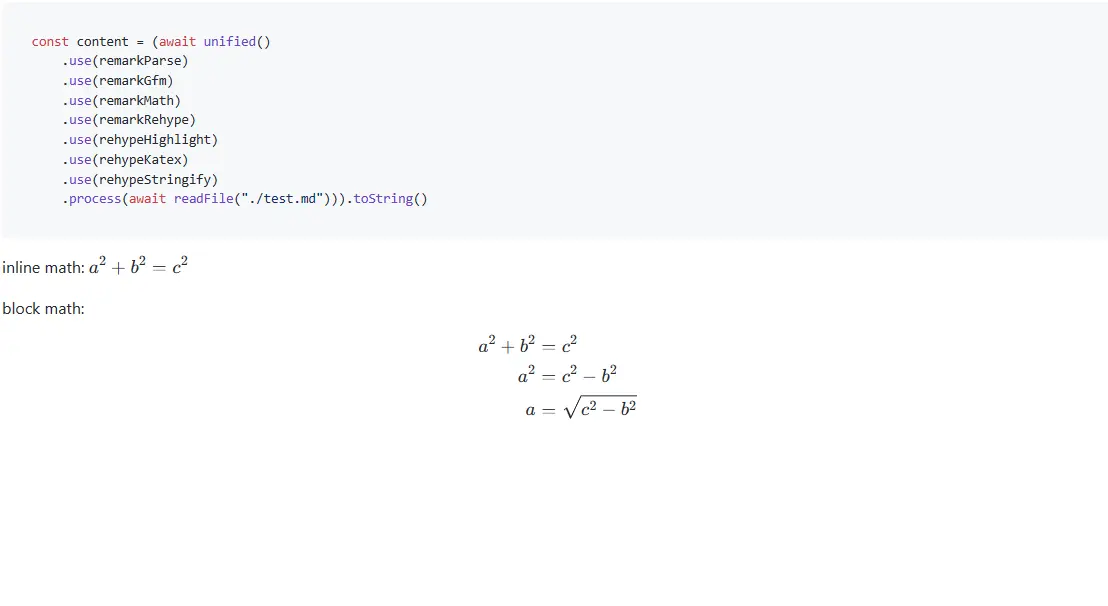
添加 公式支持
rehype 有两个插件可以为 HTML AST 添加
公式支持:rehype-katex
和 rehype-mathjax
。这里我推荐使用比较新的 rehype-katex。
注意,这个插件需要 remark-math 的支持,因此我们也需要安装 remark-math。
npm install rehype-katex remark-math
// highlight-next-line
import rehypeHighlight from "rehype-highlight";
// highlight-next-line
import rehypeKatex from "rehype-katex";
import rehypeStringify from "rehype-stringify";
import remarkGfm from "remark-gfm";
import remarkMath from "remark-math";
import remarkParse from "remark-parse";
import remarkRehype from "remark-rehype";
import {unified} from "unified";
import {readFile, writeFile} from "fs/promises";

const content = (await unified()
    .use(remarkParse)
    .use(remarkGfm)
    // highlight-next-line
    .use(remarkMath)
    .use(remarkRehype)
    .use(rehypeHighlight)
    // highlight-next-line
    .use(rehypeKatex)
    .use(rehypeStringify)
    .process(await readFile("./test.md"))).toString()
也需要 CSS 的支持,因此我们也需要引入它的样式文件。
const html = `
<!DOCTYPE html>
<html lang="zh-CN">
    <head>
        <meta charset="UTF-8">
        <meta name="viewport" content="width=device-width, initial-scale=1.0">
        <title>Just for test</title>
        <link rel="stylesheet" href="https://cdn.jsdelivr.net/npm/github-markdown-css/github-markdown-light.min.css">
        <link rel="stylesheet" href="https://cdn.jsdelivr.net/npm/highlight.js/styles/github.min.css">
        // highlight-next-line
        <link rel="stylesheet" href="https://cdn.jsdelivr.net/npm/katex/dist/katex.min.css">
    </head>
    <body>
        <div class="markdown-body">
    ${content}
        </div>
    </body>
</html>
`
下面是效果图:
自定义标记
哈哈,走到这一步,我们已经实现了将 markdown 渲染成 HTML 的功能了。但是,我们还可以做的更好!
我们可以为 markdown 添加一些自定义标记,比如为 markdown 添加一个 youtube 标记,这样我们就可以在 markdown 中插入 YouTube
视频了。 再比如,我们可以为 markdown 添加一个 aplayer 标记,这样我们就可以在 markdown
中插入音乐播放器了。这两种都是最简单的,只需要实现一个 iframe 标签就可以了。
我目前实现了 youtube 和 aplayer
两个标记,你可以在 Gitea - skyone-wzw/markdown2html 中查看完整的源码。
为了实现这两个自定义标记,我们需要使用 remark-directive 这个插件。同时,我们也需要 unist-util-visit 的 visit 函数来遍历
AST。
npm install remark-directive unist-util-visit
-
remark-directive: 用于解析自定义标记。简单来说,它帮我们实现了三类自定义标记:
containerDirective用于解析块级标签leafDirective用于解析行内标签textDirective用于解析文本标签
-
unist-util-visit: 用于遍历 AST。它帮我们实现了
visit函数,我们只需要传入 AST 和一个回调函数,就可以遍历 整个 AST 了。
先上源码,再解释:
import {visit} from "unist-util-visit";
import rehypeHighlight from "rehype-highlight";
import rehypeKatex from "rehype-katex";
import rehypeStringify from "rehype-stringify";
import remarkDirective from "remark-directive";
import remarkGfm from "remark-gfm";
import remarkMath from "remark-math";
import remarkParse from "remark-parse";
import remarkRehype from "remark-rehype";
import {unified} from "unified";
import {readFile, writeFile} from "fs/promises";

const content = (await unified()
        .use(remarkParse)
        .use(remarkDirective)
        .use(customTag)
        .use(remarkGfm)
        .use(remarkMath)
        .use(remarkRehype)
        .use(rehypeKatex)
        .use(rehypeHighlight)
        .use(rehypeStringify)
        .process(await readFile("./test.md"))).toString();

export function customTag() {
    return (tree, file) => {
        visit(tree, (node) => {
            if (node.type === "leafDirective") {
                switch (node.name) {
                    case "youtube":
                        youtube(node);
                        break;
                    case "aplayer":
                        aplayer(node);
                        break;
                }
            }
        });
    };
}

function youtube(node) {
    const data = node.data || (node.data = {});
    const attributes = node.attributes || {};
    const id = attributes.id || "dQw4w9WgXcQ";
    const title = attributes.title || "Never Gonna Give You Up";

    data.hName = "iframe";
    data.hProperties = {
        src: "https://www.youtube.com/embed/" + id,
        title: title,
        class: "embed-youtube",
        width: 560,
        height: 315,
        frameBorder: 0,
        allow: "accelerometer; autoplay; encrypted-media; gyroscope; picture-in-picture",
        allowFullScreen: true,
    };
}

function aplayer(node) {
    const data = node.data || (node.data = {});
    const attributes = node.attributes || {};
    const id = attributes.id || "N@4010201";
    const title = attributes.title || "Minecraft";

    data.hName = "iframe";
    data.hProperties = {
        src: "https://aplayer.skyone.host/?_=" + id,
        title: title,
        class: "embed-aplayer",
        width: "100%",
        height: 110,
        frameBorder: 0,
    };
}
我们的 customTag 函数返回一个 remark 插件,这个插件会遍历 AST,当遇到 leafDirective 类型的节点时,会根据 name (也就是标记的名字) 调用对应的函数。
其中 youtube 函数用于解析 youtube 标记,aplayer 函数用于解析 aplayer 标记。 他们分别生成了一个 iframe 标签,并指定了对应的 src 和其他 HTML 属性。
例如,youtube 函数默认会生成以下 HTML:
<iframe src="https://www.youtube.com/embed/dQw4w9WgXcQ" title="Never Gonna Give You Up"
        allow="accelerometer; autoplay; encrypted-media; gyroscope; picture-in-picture"/>
建议配合以下 CSS,作用是自动宽度、保持宽高比、居中。
.embed-youtube {
    height: auto;
    width: 100%;
    max-width: 560px;
    aspect-ratio: 16 / 9;
    display: block;
    margin: 0 auto;
}
效果还不错吧?
让我们整体试一试
::youtube[A cute cat]{#0_hB1VvBtqY}
结果如下:
打包成库
我们已经实现了将 markdown 渲染成 HTML 的功能,但是我们还需要将它打包成库,这样我们才能在其他项目中使用它。
提示
打包成库的主要原因是代码依赖问题,如果你在现有项目中装上面的库,大概率编译不通过。别问我是怎么知道的呜呜呜
使用 rollup 打包,安装依赖
npm install -D rollup @rollup/plugin-commonjs @rollup/plugin-node-resolve @rollup/plugin-replace @rollup/plugin-terser @types/node rollup-plugin-typescript2 rollup-plugin-polyfill-node
把刚刚安装的依赖全部移到 devDependencies 中,因为我们只需要在开发时使用它们。
由于 rollup 的使用不是本文的重点,因此我不会详细介绍,你可以参考我的 package.json 和 rollup.config.js。
{
  "name": "@skyone/markdown2html",
  "version": "1.0.0",
  "description": "A simple markdown render build with unified",
  "author": "skyone-wzw",
  "repository": "https://git.skyone.host/skyone-wzw/markdown-render.git",
  "homepage": "https://git.skyone.host/skyone-wzw/markdown-render#readme",
  "type": "module",
  "license": "MIT",
  "main": "./dist/index.min.cjs",
  "module": "./dist/index.min.mjs",
  "browser": "./dist/index.umd.min.js",
  "types": "./index.d.ts",
  "scripts": {
    "build": "rollup -c rollup.config.js"
  },
  "files": [
    "./dist",
    "./README.md",
    "./LICENSE"
  ],
  "devDependencies": {
    "rollup": "^3.25.1",
    "@rollup/plugin-commonjs": "^25.0.1",
    "@rollup/plugin-node-resolve": "^15.1.0",
    "@rollup/plugin-replace": "^5.0.2",
    "@rollup/plugin-terser": "^0.4.3",
    "@types/node": "^20.4.10",
    "rollup-plugin-typescript2": "^0.35.0",
    "rollup-plugin-polyfill-node": "^0.12.0",
    "remark-directive": "^2.0.1",
    "rehype-highlight": "^6.0.0",
    "rehype-katex": "^6.0.3",
    "rehype-stringify": "^9.0.3",
    "remark-gfm": "^3.0.1",
    "remark-math": "^5.1.1",
    "remark-parse": "^10.0.2",
    "remark-rehype": "^10.1.0",
    "unified": "^10.1.2",
    "hastscript": "^8.0.0",
    "unist-util-visit": "^5.0.0"
  }
}
import commonjs from "@rollup/plugin-commonjs";
import resolve from "@rollup/plugin-node-resolve";
import terser from "@rollup/plugin-terser";
import nodePolyfills from "rollup-plugin-polyfill-node";
import typescript from "rollup-plugin-typescript2";
import pkg from "./package.json" with { type: "json" };

export default {
    input: "src/index.ts",
    output: [{
        file: pkg.module,
        format: "esm",
    }, {
        file: pkg.main,
        format: "cjs",
    }, {
        name: "markdown2html",
        file: pkg.browser,
        format: "umd",
    }],
    plugins: [
        resolve(),
        commonjs(),
        typescript(),
        nodePolyfills(),
        terser()
    ],
};